
Having been to Mexico several times over the years and being born and bred in California, I have a deep appreciation for Mexican food. But I have a special place in my heart for the Torta, the Mexican version of a sandwich. In the US, when we think of a “sandwich,” what typically comes to mind is a flat piece of meat with some condiments like mayo or mustard, and maybe some lettuce, onion, and tomato.
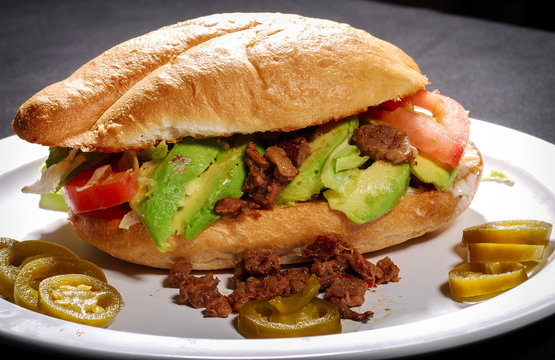
But the Torta… Ah, the torta. Like a sandwich, it’s meat between some bread, but that’s where the commonalities end, especially with the meat. The meat can be carne or polla asada (grilled steak or chicken), or puerco (pork), camaron (shrimp), polpo (octopus), and my favorite: arrachera (marinated, grilled skirt steak). Heck! You can use any type of meat – yes, cold cuts as well. But instead of mayo, there will invariably be avocado. As for vegetables, you might get some grilled onion or diced tomato. In the states, shredded lettuce or cabbage are often added as well.
What I love so much about the Torta – and I suppose sandwiches in general – is that there are no rules. It’s a wide-open playing field! But that said, there is a type of bread that is commonly used for Tortas, and that is the Telera roll.
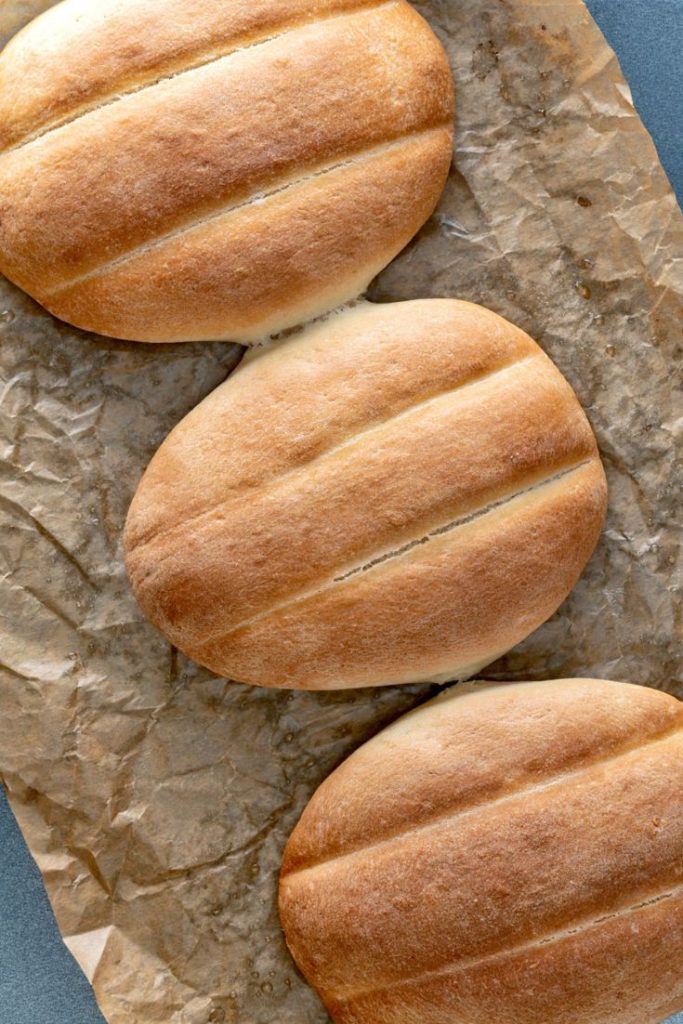
The Telera is an oval or rounded rectangle roll that is neither too wide nor long. The crumb is soft and fluffy with a firm but slightly chewy crust, making it perfect to soak up the juices of the various meats that are used. Visually, it is marked by two indentation lines across the top (we’ll get into that later). As for taste, technically, the Telera is a savory roll, but there is a slight sweetness as the dough contains a small amount of sugar.
As you can see in the picture to the left, it’s much like a hamburger bun that is ever-so-slightly longer on one side. This makes it a perfect platform for the grilled meats or seafood that are usually put on it.
Being a baker, after having a few Tortas on my last trip to Mexico just recently, I wanted to learn how to make them. And after a bit of research, and a bit of trial and error, I finally got a formula and recipe that’s both easy and delicious!
Overall Formula
| Flour | 100.00% |
| Water | 60.00% |
| Butter (Softened) | 5.00% |
| Yeast | 1.40% |
| Salt | 2.00% |
| Sugar | 4.00% |
| Total Percentage | 172.40% |
Final Dough
| Flour | 516g |
| Water | 309g |
| Butter (Softened) | 26g |
| Yeast | 7g |
| Salt | 10g |
| Sugar | 21g |
| Total Weight | 889g* 8 X 110g rolls |
| 78ºF/26ºC |
Mix. Combine all the dry ingredients together in a large mixing bowl and mix to evenly distribute. If you use a mixer, use the paddle at lowest speed. Cut butter into the dry ingredients much like you’d do with biscuits (butter should be soft). Add the water in 3-4 batches, making sure it’s well-incorporated. If using a mixer, switch to the dough hook and slowly add the water until everything has been incorporated together.
Knead. Even though I use a mixer to mix, I enjoy kneading simply because I don’t do it that often as most of my bread “no-knead” bread. Turn out the dough onto a clean work surface and knead it for 5 minutes. Work the dough into a ball, then place it in a greased bowl (I use olive oil), seam side up. Flip the dough over so the whole ball is covered. Cover the bowl with a cloth.
Bulk Fermentation. Place the bowl in a warm place and let the dough rise and expand to almost double in volume. 45 minutes – 1.5 hours. Remember, watch the dough and not the clock!
Divide and Shape. Punch down the dough to release the gas (no, you don’t want an open crumb), then divide the dough into 110g pieces. Roll each piece into a tight ball, then set aside to relax for about 15 minutes.

On a lightly floured surface, press each ball out into an oval of about 1 -1.5 cm thick. Sprinkle a little flour on top of the oval, then about a 1/3 of the way from the long side of the oval, press a straw or chopstick down to the board, being careful not to tear the dough. Repeat on the other side, then place on a baking sheet covered with parchment paper. BTW, you’ll want to move the sections together when you place them on your baking sheet. This is a method of scoring without a blade. And if you find that your dough sticks to your work surface, just use a bench scraper. to lift it up.
Final Fermentation. Once all the rolls have been shaped, cover the baking sheet with a cloth, and allow the rolls to double in volume. This could take 30 minutes to an hour depending on your ambient temperature. Preheat oven to 400ºF/200ºC.
Bake. Before baking, lightly brush the tops of the rolls with water, then bake for 15 minutes at 400ºF/200ºC or until golden-brown on top. Don’t let these overcook as the sugar, even though there’s just a little, will caramelize easily so be watchful!
Making a Torta
There are no hard and fast rules when making a torta. Even in Mexico, tortas vary from region to region. And while it’s generally accepted that the Telera roll is the common roll to use, even in Mexico, depending on the region, different bread may be used. For instance, in Guadalajara, there is the Torta Ahogada or “drowned” torta that uses a sourdough bread called “Bilote Saldado.” But for our purposes, we’ll just stick with the basic torta.
If you want something really basic, just put some grilled meat between the halved bread, top it with avocado, then close the bun. This is the way it is normally served in Cozumel. But if you want to get fancier (and I like to get fancier), coat the halves with smashed avocado, spread some shredded lettuce or cabbage (I prefer cabbage), add some sliced tomato, then top that with the grilled meat. Add lime juice for a little zest.
As for meats, you can use pretty much any meat or even seafood. Cold cuts are fine as well. My favorites are:
- Carne or Pollo Asada
- Arrachera (skirt steak)
- Grilled Octopus
- Shrimp (Grilled, Sauteed)
- Grilled Fish
My two big favorites are Arrachera and Octopus. But truth be told, I’ve only had octopus in Mexico. Not sure how it’s prepared, but it ROCKS!

Pingback: Carne Asada – It’s so EASY! | The Dawg House!