
Check out my retro tech T-shirt store
Previously on ‘ZX81: a Raspberry Pi retro restyle’: I used a headerless Arduino Leonardo to connect a ZX81 microcomputer keyboard to a Raspberry Pi via USB, using code to handle normal, shifted and function-shifted key presses.
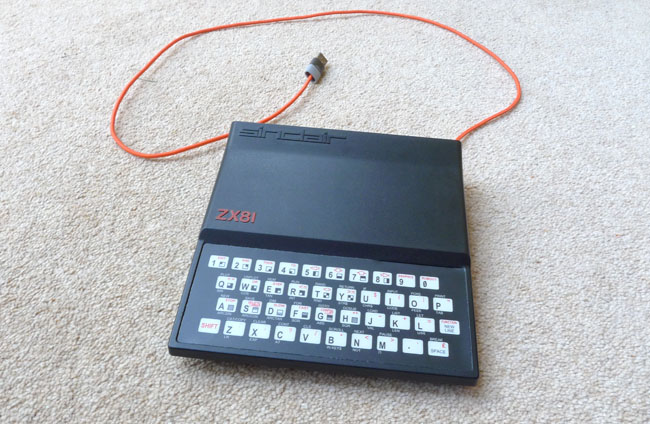
After some searching on eBay, I found an old ZX81 going cheap because it lacked cables, though when it arrived, I found the computer itself to be in excellent condition. Possibly it has never been used, though how if that were the case the cables were lost and the box got so tatty is a mystery I will probably never solve.
Opening up the Sinclair machine was the work of a moment. Some screws are located under the computer’s rubber feet, so remove the latter carefully so you can put them back afterward – as was unlatching the keyboard connector ribbon and removing the motherboard.
One particular sign of age was the keyboard ribbon, which seemed in good condition at first. Unfortunately, 30-odd years is beyond the life expectancy of the plastic from which it was formed, and it soon began to perish and crack open. Eventually it provided so little protection for the delicate wiring, one line broke. Fortunately, I had a modern replacement. With a little gentle prying, I was able to lift the original membrane keyboard off the casing – it was originally attached with a self-adhesive pad – and replace it with the new one, ready to be stuck down in its place.
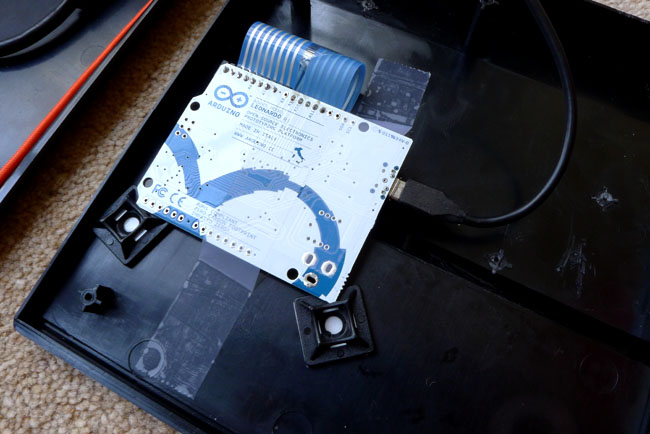
That was a relatively easy process; rather more tricky was getting the Pi and its cabling to fit inside the ZX81 casing. Fit it does, but only just, and I have had to make a couple of compromises.
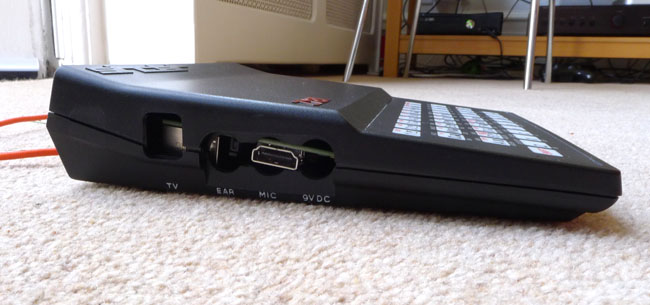
My goal was to expose as many of the Pi’s ports as possible, at least among those I use. The analogue audio and composite-video jacks, for instance, have never been used, so I was happy for these to be hidden. But the HDMI, Ethernet, USB, GPIO and – obviously – power jack needed to be accessible.
If you plan to try this yourself, the best advice I can give is to spend plenty of time trying out possible internal configurations of Pi and cables. The location of the Leonardo board is fixed to a degree by the size of the ribbon cable coming off the keyboard. Eventually, I settled on placing the Pi upside down with the USB and Ethernet facing the back of the casing, and the HDMI port adjacent to the ZX81’s original video out, cassette and power ports.
This location required me to remove only three of the case’s internal supports – they yield easily to a pair of wire cutters, and you can rub the nub down with glass-paper.
I had a short Ethernet cable already, so I ordered a cable joiner to clip on the end as my new Ethernet port. This would be accessed through what was once the ZX81’s Ram Pack connector bay. Likewise the single female USB port I planned to fit, a second USB input for the power feed, and GPIO pins on a ribbon extension cable.

eBay provided me with the Ethernet cable joiner – a small plastic unit that could be glued to the base of the case – and a couple of short USB adaptor cables with right-angled male Type A connectors. My Ethernet cable had a standard connector, but with some careful whittling away of excess plastic, I was able to slot it into the Pi and bend the cable sufficiently for it to fit.
Fitting it all together is a fiddly business, and I found the only way to do it was to glue down some cables to hold them steady – partly to keep them where I wanted them but also to stop rigidity in the cable moving the Pi away from its desired location. Only use tiny amounts of glue so you can easily remove the cables if you ever need to; the glue is really just an extra hand to hold the cable down for you.
Unfortunately, the GPIO extension cable connector added too much to the Pi’s depth and so prevented the ZX81 case from closing with it in place. So I had to reject that plan. I also had to remove a very small part of the lower half of the case at the back to fully expose the Ethernet port. Aside from opening the case’s separate cassette and power ports into a single port to fully expose the Pi’s HDMI connector, I had to make no other changes to the ZX81’s external appearance.

Having had to drop GPIO pass through, my second compromise was the power cable. I found a male to female micro USB cable, but the male end was too large to fit in the case, even when whittled down, so for version 1.0, I elected to fit a standard cable and route it out through the back of the case. This is not ideal, and I will address this.
My right-angled USB cable was just too short to allow the female jack to be fitted to the case, so I decided I needed either to cut away more of the case itself – something I have been trying to avoid – or fit a short USB extension cable that can be correctly routed inside the case so that the port is facing outward rather than dangling outside. There wasn’t really room for the latter, so I tried a third option: cut away the right-angle cable’s connector sheathing to see if it would then bend enough for my to place it where I wanted it. Fortunately, it did. Super glue fixed the female USB port in place.
For now, though, even with these compromises, I was was able to fit the two halves of the ZX81 case together and screw them into place. I now have a Raspberry Pi inside a ZX81, complete with working membrane keyboard.
There’s room for improvement. I’d like not to have a power cable dangling out of the back – the orange USB cable in the pictures – and I really would like to expose the Raspberry Pi’s GPIO pins somehow.
Then there’s the fundamental drawback with this set-up. Gorgeous though the ZX81 is, its real weakness is the membrane keyboard. Sure it works, but it’s a chore to use. I can imagine newcomers to computing coping with it in the 1980s – they didn’t know better; they had nothing to compare it to – but it’s hard going when you’re accustomed to a good Qwerty deck. But, as I say, it works. I certainly going to work on the Arduino code to get more functionality out if it.
Hardware hackers with more experience and confidence than me could do a lot better by stripping the Pi of some of its ports – USB, Ethernet and the GPIO header in particular – to run wires from the board to the case’s ports rather than regular cables. This should make everything fit a lot more smoothly.


Yes it’s very nice idea to use old zx81 case with raspberry pi. Although I would just use modern usb keyboard with raspberry since zx81 membrane keyboard is failing due to old age anyway. Old zx81 membrane keyboard was pain to use even when it was new. I have case of my old zx81 lying around (motherboard is gone long time ago to where nobody knows) and raspberry pi lying around so this is ideal for me. Thanks!
Just wanted to say, thanks for the excellent write up, I started working on similar project after reading your article. http://zx81keyboardadventure.blogspot.com.au/
I was one of those newcomers in the 1980s who didn’t know any better! 🙂 Congratulations on taking the time to make it all fit and work.
I must have filled about 50 cassette tapes with programs that I typed in on that awful keyboard. I loved every minute of it. I still boot it up every once in awhile just to smile at the memories. Nice job! especially getting that keyboard to work with the Pi and shoehorning all the cables in there.
Brilliant piece of work, Tony. Nicely done.